
Drop-in mode enables the seamless addition of more WANs, thus increasing the speed and reliability of your network, and it does it without having to make changes to your existing firewall.
Drop-in Mode allows your Peplink router to be deployed in a network without making any changes to your existing network devices. This feature simplifies the installation by allowing the Balance to transparently and seamlessly work with your routers and firewalls.
This is a brief step by step walkthrough on setting up a Peplink load balancing router in “Drop-In” mode (transparent/pass-through), allowing you to use your current firewall without any new rules or modifications.
Initial Network Configuration
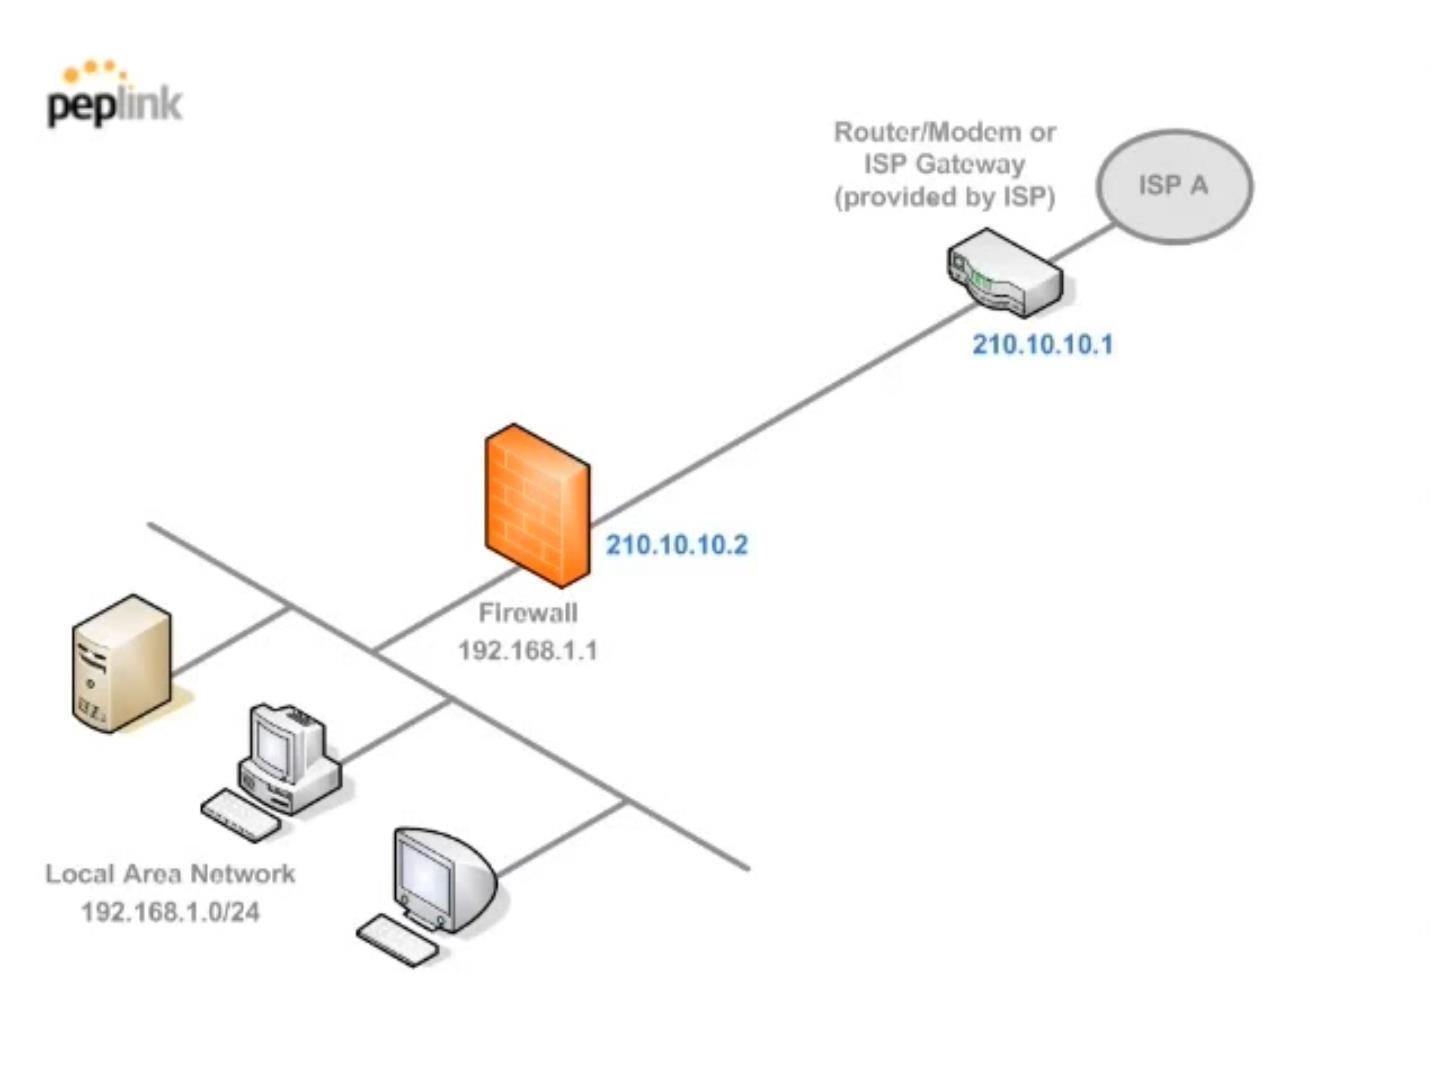
Suppose your existing network looks similar to this diagram. In this example, the default gateway router is connected to the ISP. With this IP address the firewall is performing network address translation for the local area network to access the internet and 210.10.10.2 is its external facing IP address.
Add the Peplink Router
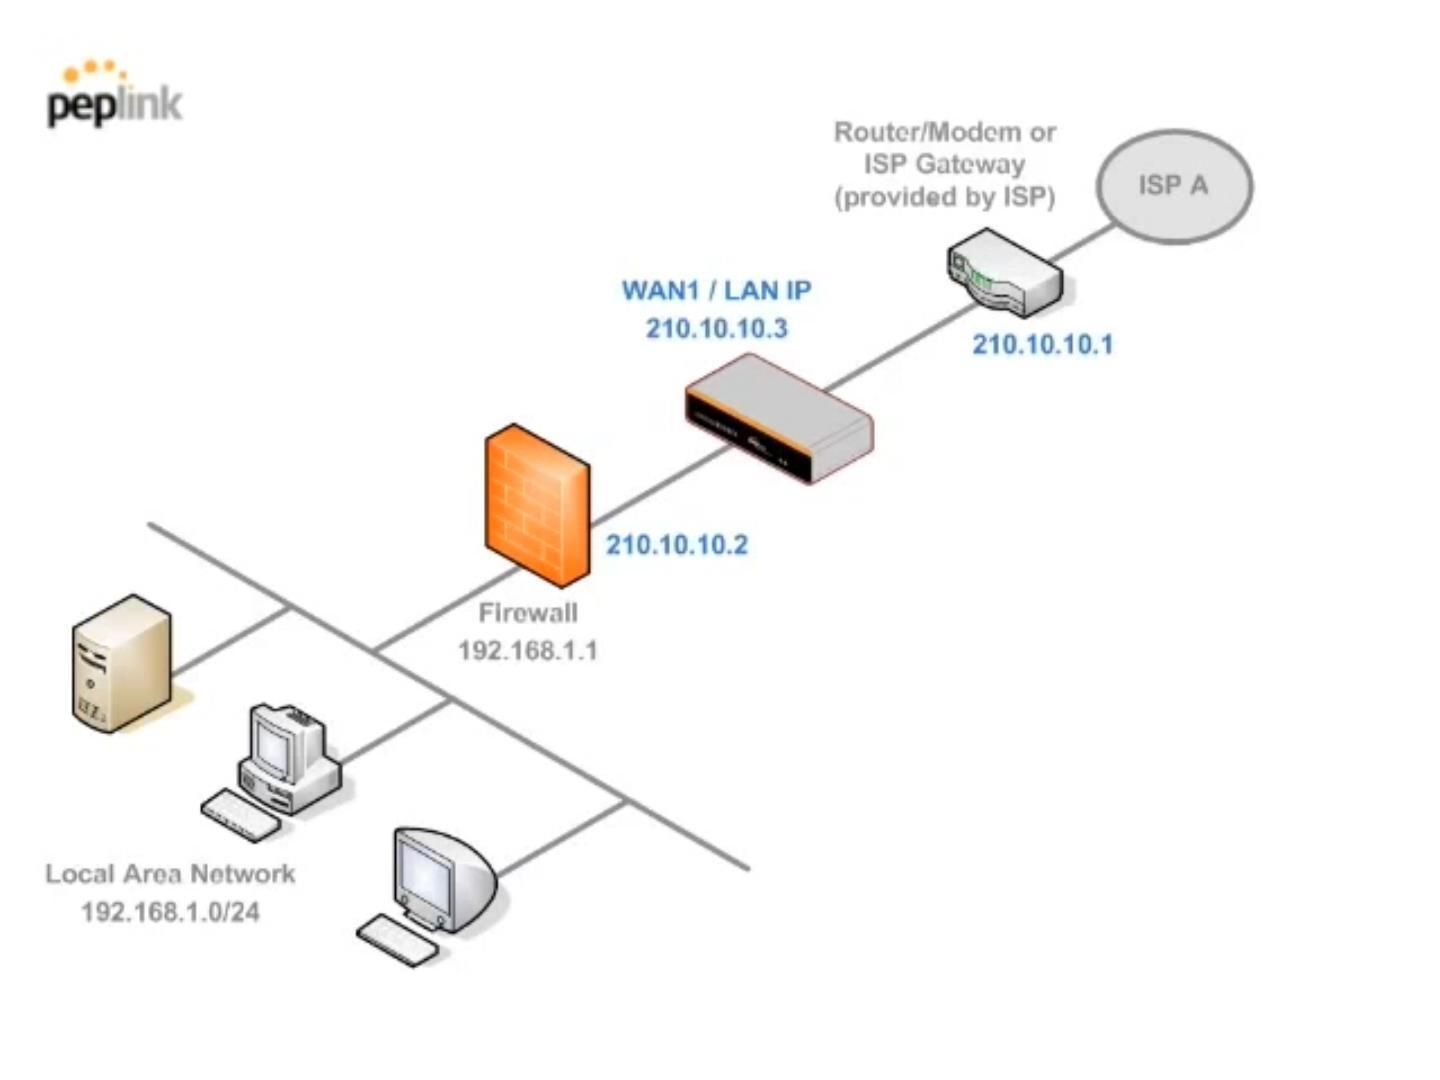
The goal is to not have to change any setting on your existing firewall as well as allow for any remote connection to remain unaffected. To do this and be able to manage the Peplink router you need an additional public static IP from your ISP (if you do not already have one). In this case, it is 210.10.10.3
Now you want to add the Peplink between the router and the firewall. Under Drop-in Mode traffic is forwarded between the LAN and the WAN1 ports of the Balance without performing any IP address translation. In this case, the firewall will not notice any changes in the IP address for the hosts on WAN1 and the same for the other way around. Here the IP address to 210.10.10.3 will be used for the Balance’s LAN and WAN1.
Add more WANs for Unbreakable Connectivity
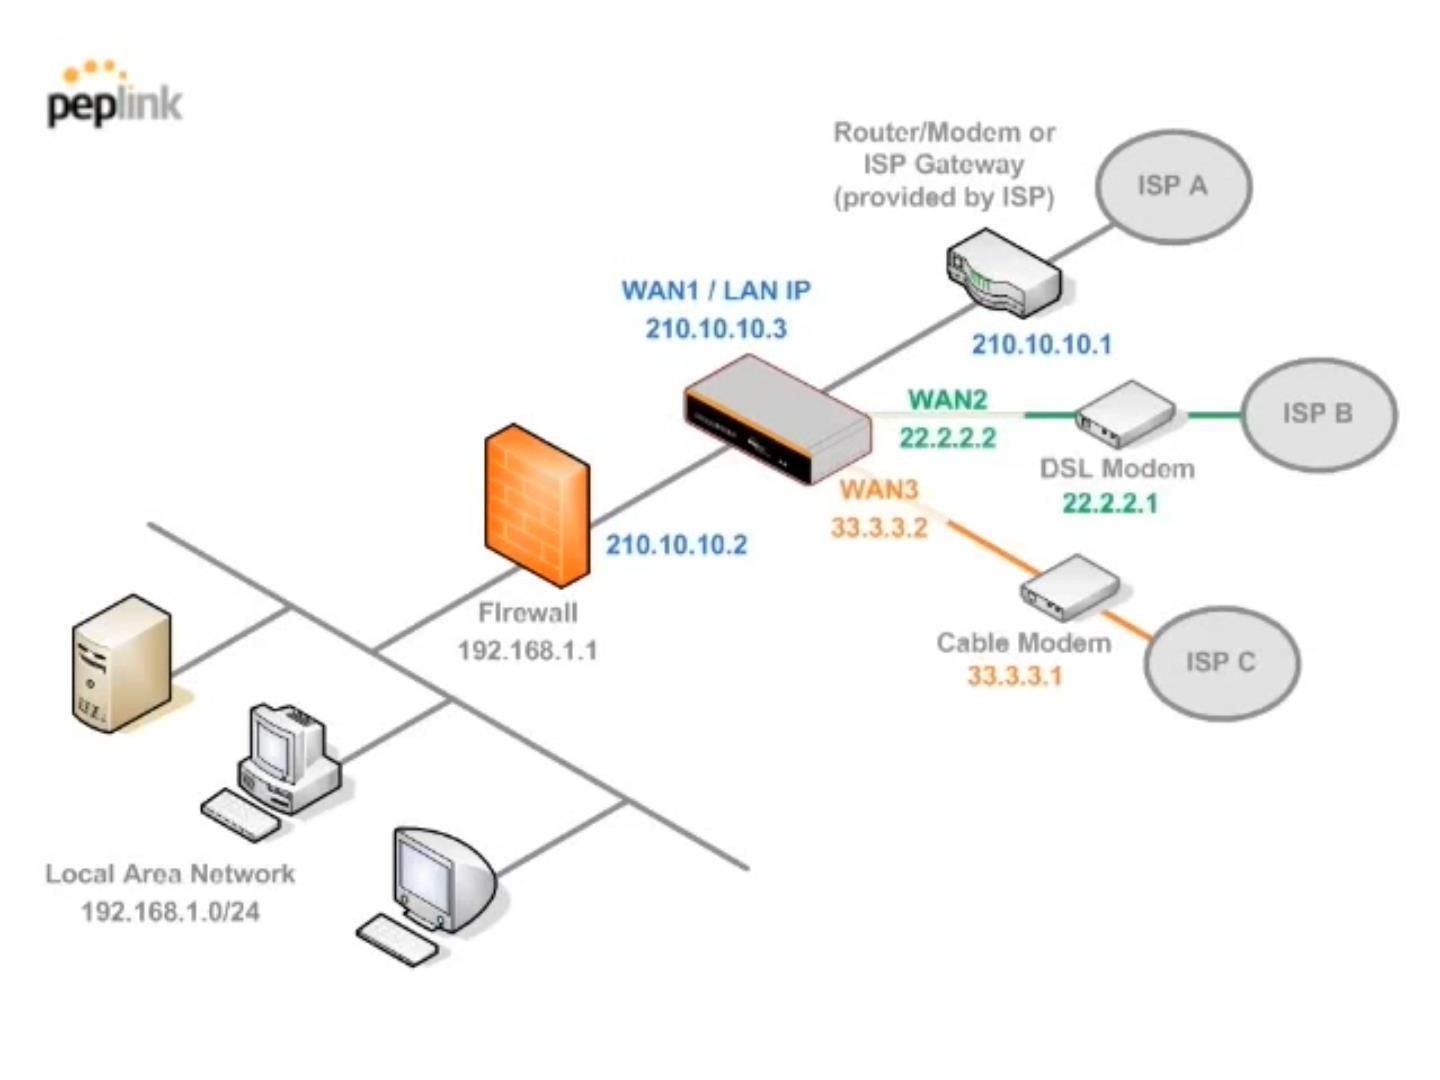
Once the Peplink router is installed in the network you can add more ISP connections to aggregate and load balance across multiple links. The number of additional WANs you can add will be dependent upon the model of your Peplink device.
In this example case, DSL and cable connections will be the second and third internet connections. This should be how your network looks like after installing the Balance under Drop-in Mode.
Learn more about SpeedFusion
Step by Step - Drop-in Mode
Peplink has included a setup wizard to make the initial crop-in mode configuration easy. Log into your Peplink router and select the "Setup Wizard" from the top menu. If there is no "Setup Wizard" menu on your router, go to the Status menu and at the bottom of the page, you will see a link to "unhide" the Setup Wizard.

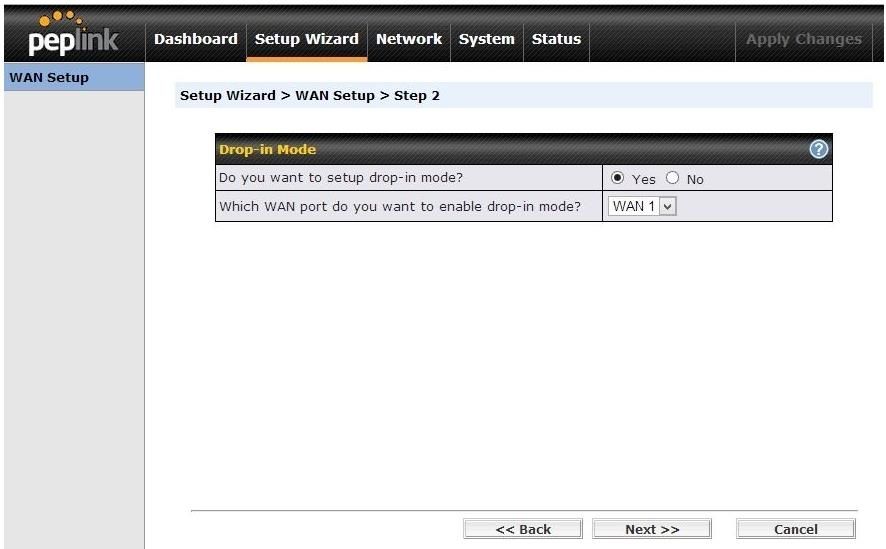
Select Drop-In Mode for WAN 1
When asked "Do you want to setup in drop-in mode?" select "Yes" then select the WAN interface that your main ISP will be connected to (typically "WAN1") then click "Next"
Select the WANs to Configure
Select at least WAN1 to configure using the Setup Wizard. If you have the information available for the additional WANs you will be adding, then select these WANs too. If you don't have that information available yet, no worries. You can easily individually configure the WANs later using the "Network" and 'WAN" setting menus.

Configure the Drop-in Mode WAN
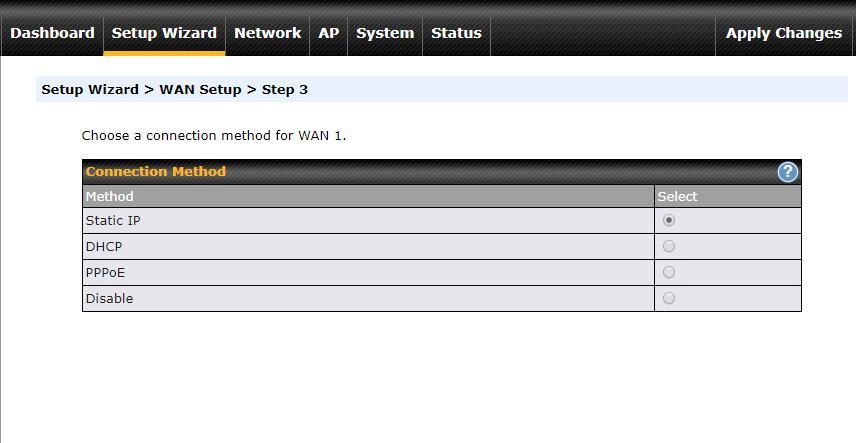
Select the type of address that your ISP has provided for you. Typically this will be "Static IP". Some ISP's like Telus will need you to select DHCP even though you have purchased a Static IP service from them. With Telus, they use DHCP and then they assign a static reservation for you using the MAC address of the Peplink routers WAN. Other ISP's like SHAW will give you all the details you need to enter in the Static IP configuration.
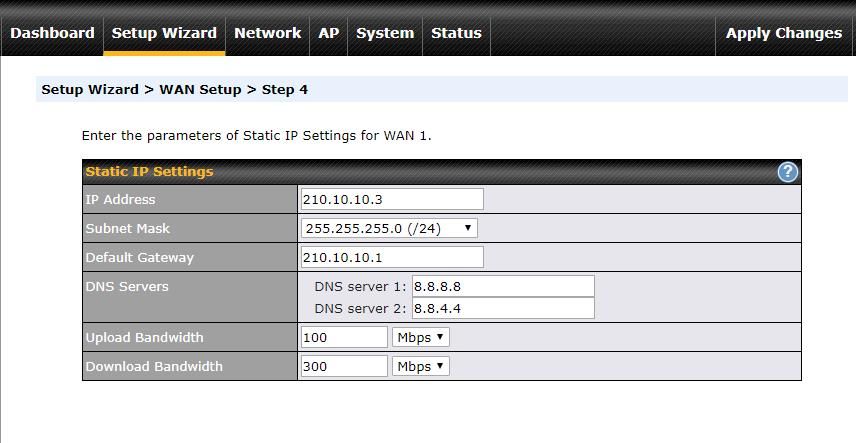
Configure the IP Address Settings
Enter the static IP information that your ISP has given you. It is also good to enter the "Upload" and "Download" speeds as that will assist the Peplink QoS and load balancing features to be more efficient.
Select the preferred WANs to be active
Choose the preferred WAN port(s) to be used for this connection. If there are ports left unselected they will only be used when none of the primary port selections are unavailable. All the WANs that are selected as preferred WANs will be active and ready for load balancing or SpeedFusion functionality.

Finalize the Wizard settings
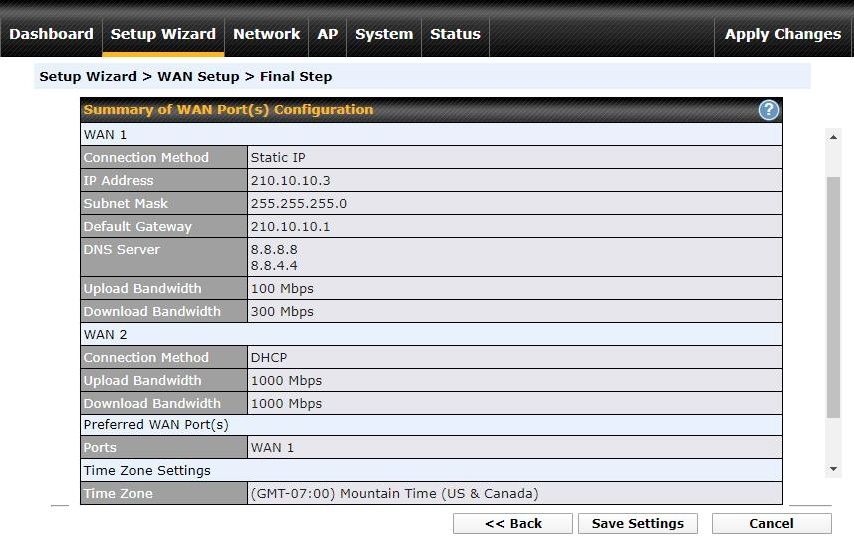
In this final wizard step, you can review the settings. You can choose to use the back button to make changes as required and when you are satisfied with the settings you can click the "Save Settings" button and commit the configuration to the router.
Connect the cables!
Now that the router is set up in "Drop-In" mode it's time to put the Peplink in-line
Connect the LAN interface of the Peplink to the WAN of your firewall
Connect the WAN1 port of the Peplink to your ISP's modem/router
Drop-in Mode allows Peplink Balance to be deployed in a network without incurring any configuration changes to existing network devices. for this example in the network diagram, ISP A provides a 24-bit network 210.10.10.2 / 255.255.255.0, 210.10.10.1 is the default gateway. The Firewall is performing NAT (Network Address Translation) for Local Area Network 192.168.1.0 to access the Internet.
Firewall settings:
NAT Enabled
External Interface IP: 210.10.10.2/24
Default Gateway: 210.10.10.1
Internal Interface IP: 192.168.1.1/24
What is the router doing in this example case?
When operating, the Peplink Balance forwards the traffic between LAN and WAN1 of the Balance unit without performing any IP address translation. The Firewall will not notice any change in the IP addresses of the hosts on WAN1, and vice-versa. Because the Firewall is keeping its same configuration, the firewall's default gateway will still be ISP gateway 210.10.10.1. (Do NOT change the Firewall Default Gateway to Peplink’s IP 210.10.10.3)
For the other WAN connections, they will be operating in NAT mode by default, which allows proper routing of traffic coming back and forth via different ISPs.
Notes:
PPTP server will be disabled automatically if the Balance is deployed in Drop-in mode.
Drop-in mode can be configured on any WAN port. But only one WAN port can be configured in Drop-in mode.
High Availability will be disabled automatically if the LAN Bypass port is selected as the WAN port for Drop-in mode.
The example you give assumes the ISP provides a subnet to you (/24) but drop-in mode with a single static IP is supported. To enable and configure it you need to click on the blue tooltip next to the Drop-In Mode Settings.
Peplink Firewall Setting for Drop-in Mode
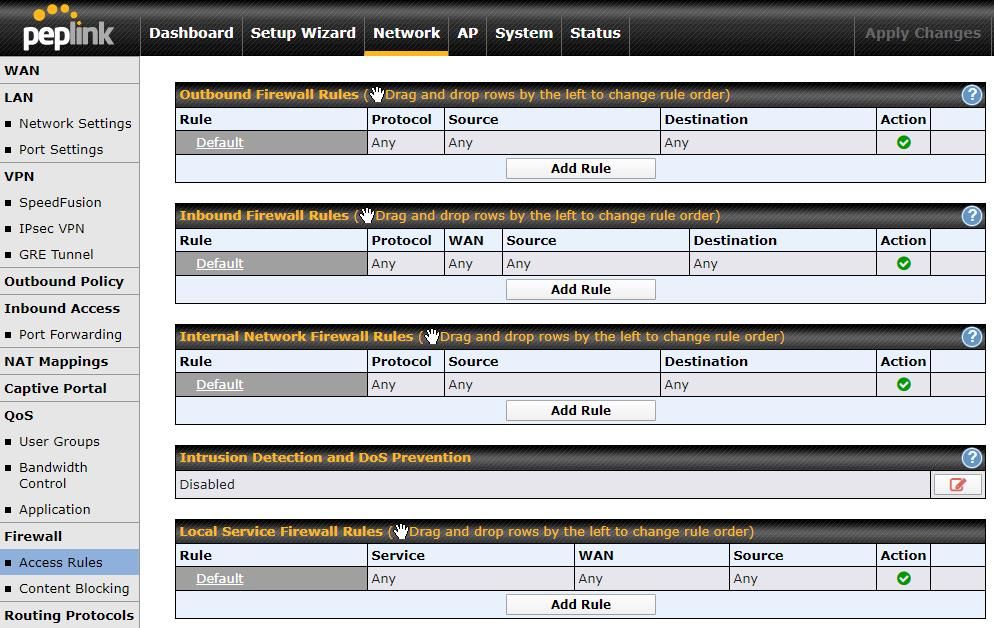
When using the Peplink router in drop-in mode and it is sitting in front of your existing firewall, make sure that all the firewall rules in the Peplink Router are set to allow all traffic as shown in this screenshot.
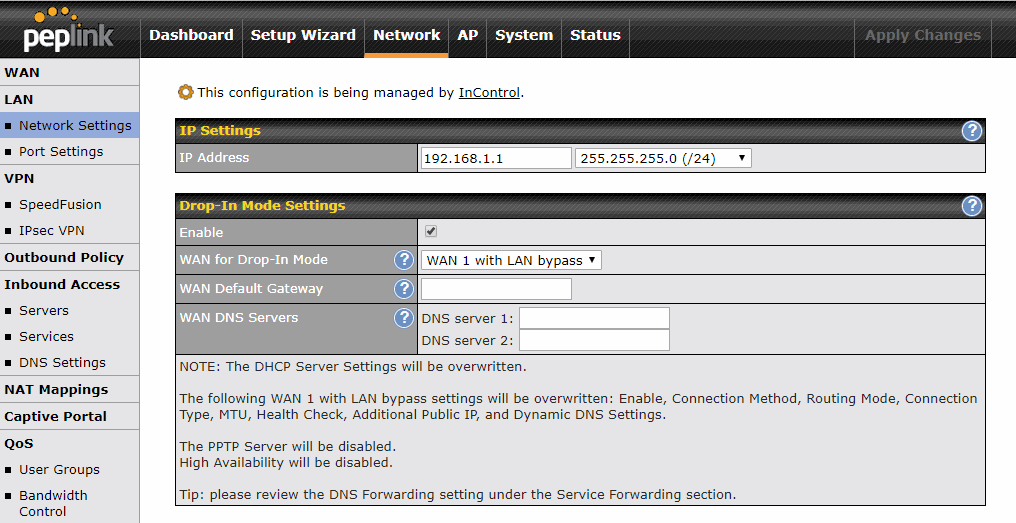
Manual Configuration of Drop-In Mode
Go to Network >LAN>Network Settings and choose your LAN.
Update the LAN IP Address under the IP Settings option with the Drop-in Mode IP to be bridged WAN-to-LAN.
WAN for Drop-in Mode: Select the WAN port to be used for drop-in mode. If the LAN Bypass is selected, the high availability feature will be disabled automatically. The Wan can be configured via Network>WAN. Additional IP must be available from the ISP. Normal deployment of Drop-in Mode will consume an IP to Bridge to the LAN. However, Drop-in mode with a single static IP is supported. To enable and configure it you need to click on the blue tooltip next to the Drop-In Mode Settings.
WAN Default Gateway: Enter the WAN router’s IP address in this field. If there are more hosts in addition to the router on the WAN segment, click the button next to “WAN Default Gateway” and check the I have other hosts(s) on WAN segment box and enter the IP address of the hosts that need to access LAN devices or be accessed by others.
WAN DNS Servers: Enter the selected WAN’s corresponding DNS server IP addresses.
Save/Apply Changes
Seamlessly add multiple WANs to your network for Unbreakable Connectivity!